We are hugely enjoying parenthood. Yes, we're exhausted, yes it's an enormous challenge physically, mentally and psychologically, yes it is overwhelming. And it's fantastic. It is so much fun watching Kate develop and to see the changes as she gets more and more control over her actions. We didn't have any experience with babies, and I figured that babies were just lumps until they were a few months old; so I was sure surprised to find that Kate had a definite personality right from day one, and it's only got stronger.
What we've just started recently is introducing Kate to solids, and we're doing it through the "baby led weaning" methodology (thanks to Mila's Daydreams for the inspiration, otherwise I would never have known about it). So instead of spoon feeding her mush, then graduating up to solid solids, we're giving her pieces of whole food with appropriate shapes and "handles", and the argument is if she can support herself sitting comfortably, has sufficient development to pick up the food and bring it to her mouth, and be given the opportunity to work out how to move the food around her mouth on her own, she'll be able to feed herself when she's ready. Obviously, we have to provide her with healthy choices, and to not give her physically dangerous shapes or textures, but otherwise, if she's given the opportunity to figure it out on her own, with plenty of time, then she'll manage ok on her own. I really liked the idea, so here we are trying it.
Kate has been sitting up quite well for some time, but I didn't want to introduce her to solids until she was at least 6 months. Instead, we've been sitting her up at the table with us when we eat, and we gave her a baby spoon (plastic & silicone) to play with on her tray along with some other toys. She worked on getting it to her mouth, and figuring out how not to gag herself with it. Then we progressed to raw carrot sticks that she could do the same process; once she got something with flavour to suck on, the spoon was history. I was going to keep up with the raw carrot sticks for a bit longer, but yesterday we got some sweet potato fries on the ferry, and she was all eyes, so we thought "what the heck". We found one long enough for her and let her grab it and straight to mouth and suck suck suck, and grumpy pants when we didn't want to give her any more (they were a bit too salty so I didn't want to overdue it; besides, it was just an experiment).
Hmmm. OK. So last night, her Grandma prepared her some separate roasted veggies (with the appropriate dimensions and no added salt), and I cut a stick off for her from my steak, and she was hugely happy. She noshed on the squash right away, then tried the French fingerling potato (white shot with pink), then really sucked away at the steak, and finally tried the purple potato. We were fascinated at what she wanted to pick first and the fact that she ignored the purple coloured food until last, but once she tasted it and realized it was the same as the potato she'd been enjoying, she really got into it. This morning was some apple, banana and mango slices. She tried them all, but banana was the first and primo choice. The mango produced some consternation and a decision that she wasn't really that interested in the mouth feel or taste but loved the hand-squishiness of it! The apple was a bit of a challenge to get a handle on but she did enjoy sucking on it.
A whole new dimension has been opened up, for her and for us! What fun (and what a mess!).
Sunday, December 19, 2010
Baby Led Weaning
Wednesday, November 24, 2010
Winter Relief

We had our first snow of the season (Kate's first snow!) and it's still sticking around as the Arctic outflow is keeping temperatures down. Rather unusual for here in November; that's more like January. So we're all suffering from really dry skin and chapped lips & cheeks this week. So off to the pantry to mix up some winter relief.
Rich Body Lotion
A beautiful thick lotion that feels silky going on and smells even better.
Step one:
Steep about 1 tbsp herbal blend (I use 1 tsp rose petals, 1 tsp comfrey root, and about 2 tsp calendula petals) in:
100 mL boiling water (distilled is recommended)
for at least 15 minutes. Drain into a ceramic dish or glass measure to cool. Once cool, add:
2 tbsp aloe vera juice
2 tsp witch hazel extract
Step 2:
Melt in non-reactive double boiler (I place the oils in a ceramic bowl over a pot of water and simmer):
100 mL carrier oil (I use grapeseed oil)
1/2 tsp grated cocoa butter
2 tsp grated beeswax
2 tbsp shea butter
Once the oils have been melted, get the temperature up to 175 F (I use a candy thermometer), keep stirring & heating for at least 20 minutes to properly and completely melt the shea butter, otherwise it'll crystalize into little bits in your mixture once cooled.
Let the oils cool down once finished, so that they're still at least mushy if not totally liquid, but not still super hot.
Step 3:
Gradually pour your herbal liquid mixture into your oils while using a stick blender to thoroughly beat everything together until creamy. Make sure to do this part gradually and thoroughly so that a proper emulsion forms, otherwise you'll get separation of the oil & water. You may wish to add essential oils at this point; I use about 10-15 drops altogether, but you can use up to 25-30 drops. Suggested essential oils would include lavender, citrus, rose geranium, depending on what you need or what the purpose is for.
Lip Balm
...which also doubles as a great baby bum balm!
Essentially, you want these proportions:
20% beeswax
25% solid at room temperature (e.g. coconut oil or shea butter)
15% brittle at room temperature (e.g. cocoa butter)
40% liquid at room temperature (e.g. pomace olive oil or grapeseed oil, cold pressed for either)
So when I make it, I use:
20 g beeswax
25 g shea butter
15 g cocoa butter
40 g grapeseed oil
plus
1 tbsp total of rose petals & calendula petals
10 drops of essential oil (e.g. lavender, tea tree, rose geranium)
I heat up the grapeseed oil separately in a Pyrex measure in the microwave, then infuse about 1 tbsp altogether of rose petals and calendula petals while the other oils are melting & heating, then strain it. If you're coordinated enough, you could do this a few days in advance so that the herbs have some opportunity to infuse into the oil; if you do, keep the oil in a warm spot, like a sunny windowsill (hah! around here?) or on top of the refrigerator.
As with the lotion, I heat up the beeswax, shea and cocoa butters in a double boiler, heat to 175F and hold for 20 minutes, stirring regularly. Once that's done, I add the strained oil infusion to the hot mixture and bring it back up to 175F, stirring. You can remove from heat, let cool a little, and stir in any essential oils at this point if you wish. I pour it into clean plastic jars that I got for the purpose (a long time ago), but I'm sure Tupperware/Rubbermaid or margarine/cottage cheese/cream cheese containers would be just fine. Let cool, and it'll solidify quite solidly. You have to scrape it a bit with your finger or thumbnail and rub it in your hands to soften it a bit before applying, but it works really well once warmed. If you want it a little less solid, you can always change the proportions by increasing the amount of grapeseed oil in the recipe.
Whipped Shea Butter
This is now my favourite dry skin relief.
10 oz Shea butter (preferably unrefined, cold pressed or however the equivalent works for it)
6 oz carrier oil (I used grapeseed oil)
essential oils
Melt the shea & oil in a double boiler (as before, I use a ceramic bowl set over a pot of boiling water) and bring up to 175F. Keep at that temperature, stirring regularly, for 20 minutes.
Cool over a bowl of ice water, add your essential oils, then whip using a hand mixer or stand mixer, until it reaches "soft peak" stage (like whipping egg whites or whipping cream). I didn't wait that long; mine got just to the equivalent of "trace" when making soap (which means you can dribble some of the mixture over the surface and write with the dribbling). Pour into your clean containers, and it'll set up into a mousse/paté like consistency.
This makes a HUGE batch, so feel free to halve or even quarter the recipe; although with one family member that has psoriasis, one with eczema, and all of us with dry hands, we'll go through it pretty darned fast. The consistency when cool is fabulous, creamy smooth, it melts into the skin instantly and stays moisturized for a long time.
Pickle-y Goodness

Dave & I visited family in Ottawa a couple of years back, and while we were there, we went to the Canada Agriculture Museum. While we were there, one of the demonstrators was canning up pickled carrot sticks. Before I started preserving the harvest, I wasn't that huge of a pickle fanatic; I mean, I like some pickles, but I know that some people like all kinds of pickled things. These pickled carrots were absolutely marvellous. So I knew I had to have the recipe, and lo! they had the recipe right there for us to take away.
Pickled Carrot Sticks
4 lbs carrots, peeled & cut into 4" sticks
6 fresh dill sprigs or 3 tsp dill seed
18 peppercorns
6 cloves garlic, peeled & thickly sliced
3 1/2 cups cider vinegar
2 1/2 cups water
1/3 cup honey
- Boil water, vinegar & honey
- Raw pack carrots with 1 clove garlic, 3 peppercorns and one sprig of fresh dill or 1/2 tsp dill seed per scalded pint jar.
- Pour hot liquid over carrots to 1/4" headspace, and use non-reactive utensil to remove air bubbles.
- Process for 15 minutes in boil water bath canner (or whatever is appropriate for your altitude).
Dill Slices
4 lbs medium cucumbers
1/3 cup honey
1/2 cup pickling salt
4 cups cider vinegar (see *Note below)
4 cups water
3 tbsp pickling spices in tea ball or spice bag
5 bay leaves
5 garlic cloves, peeled & thickly sliced
5 heads fresh dill or 5 tsp dried dill seed
2 1/2 tsp mustard seed
- Wash cucumbers, scrubbing lightly with soft vegetable brush to remove spines. Cut 1/8" off blossom end and discard. Cut into 1/4" slices or rounds
- Combine water, vinegar and salt, and place tea ball or spice bag of spices in, bring to a boil & simmer 15 minutes.
- Add honey, dissolve, and bring back to boil.
- Into each scalded pint jar, place 1 bay leaf, 1 garlic clove, 1/2 tsp mustard seed and 1 head of fresh dill or 1 tsp dill seed.
- Pack cucumber slices into hot jar with 3/4" headspace. Add hot pickling liquid and cover to within 1/2" headspace, and use non-reactive utensil to remove air bubbles.
- Process in boil water bath canner for 15 minutes (or whatever is appropriate for your altitude).
We have usually an over-abundance of lovely French filet green beans (we grow Maxibel), and while we freeze a lot, we thought it'd be nice to try some kind of pickle recipe. This one is a winner, and is fantastic with dumplings like pot-stickers.
Dilled Green Beans
4 lbs green beans, tipped & snapped into pieces (of course, if you want to have competition worthy beans, then Blue Lake is apparently king, and you want them cut exactly to fit your pint jars. Meh, I say; I just wanna eat them!)
4 cups cider vinegar
4 cups water
1/2 cup pickling salt
1/3 cup honey
3 tbsp pickling spices into tea ball or spice bag
7 cloves garlic, peeled and cut thickly
3 1/2 tsp mustard seeds
3 1/2 tsp hot pepper flakes
7 heads fresh dill heads or 7 tsp dried dill seeds
- Bring to boil vinegar, water, salt & spices; reduce heat and simmer for 15 minutes.
- Add honey, dissolve, & bring back to boil.
- Into scalded pint jars, place one clove garlic, 1/2 tsp mustard seed, 1/2 tsp hot pepper flakes, 1 head fresh dill or 1 tsp dill seed.
- Pack bean pieces into hot jars.
- Ladle hot pickling liquid into jars, leaving 1/2" headspace, and use non-reactive utensil to remove air bubbles.
- Process in boiling water bath canner for 10 mintues (or whatever is appropriate for your altitude).
Saturday, November 13, 2010
Impossible Pie

I had this dessert for the first time at my best friend's house when I was in my early teens, and thought it was just so awesome that I got the recipe from her mum. What makes this impossible is that all the ingredients get piled into a blender or food processor, and the end result has three distinct layers: a crust, a middle, and a topping. Pretty cool, huh?
The original recipe calls for milk, but as I'm on a total dairy elimination diet for my little girl's eczema, we thought we'd try it with coconut milk instead. We're never going back. It was incredible.
We've also done this recipe using a can of pumpkin, and it works really well too. So in the following recipe, replace the coconut milk with actual milk, and just add a can of pumpkin puree, eliminate the coconut, and add some pumpkin pie spicing as desired.
Impossible Pie
4 eggs
1/3 cup oil
1/2 cup flour
2 cups coconut milk (take a 400 mL can of rich, full coconut milk, not skim, and make up the difference with water)
2/3 cup sugar
1 cup grated coconut
2 tsp vanilla extract
Blender the eggs first. Add oil & coconut milk & blend again. Add remaining ingredients and blend until fully mixed. Pour into greased 10" pie plate and bake at 350F for 1 hour (check at 45 minutes if your oven runs hot), or until centre is firm, and top is toasted a golden brown.
UPDATE: While quite tasty hot, it's even better chilled and eaten cold the next day. It might be something like soups and stews, it improves with sitting in the fridge over night. If you can manage to keep your fork out of it until then, I recommend it!
Tuesday, November 9, 2010
Cucumber Relish

We had an overabundance of cucumbers this year (they went a little nuts in our greenhouse), so aside from doing pickled cucumbers (we had a bit of a glut left over from last year as I couldn't bear eating them during pregnancy - I know, go figure!), I had to find something else to do with them. Along came this great cucumber relish recipe, which worked really well for us.
Cucumber Relish
6 lbs (about 10 cups chopped) cucumbers (we used a mix of Cool Breeze, Lemon and Suyo Long)
1 cup chopped white onion
4 cups chopped red bell peppers
3 cups chopped green bell peppers
1 cup chopped celery (about 4 ribs)
1/2 cup pickling or Kosher salt
3 1/2 cups pickling or cider vinegar
1 1/2 cups brown sugar
4 tbsp mustard seed
2 tbsp celery seed
1 tbsp ground cinnamon
1 tsp ground cloves
2 tsp ground allspice
2 tsp ground turmeric
Place all vegetables into an enamel lined or stainless steel pot and stir in salt. Cover & let stand 4 hours at room temperature.
Put vegetables into large colander and drain. Rinse with cold water, using hands to squeeze out excess liquids. Repeat rinse & squeeze.
Combine vinegar & spices & sugar and bring to boil. Cook for 10 minutes. Add drained vegetables and stir to blend. Bring back to full boil, reduce heat & simmer 10 minutes. Fill hot, scalded half-pint or pint jars to 1/2" headspace and process in boiling water bath for 10 minutes (up to 1000 feet altitude).
Monday, November 8, 2010
Nose to Tail... almost
This year we did a much better job of using the lovely venison that Dave got. We've become a little more adventurous, so we saved the heart, liver and tongue, along with the meat and bones this year. With our fabulous pressure canner, we can do meat preservation. Last year was the first year we tried chicken stock, and that was hugely successful. This year, we tried venison chili as well as stock, and they were brilliant.
One of Dave's favourite blogs is Hunter Gardener Angler Cook. Here's his venison stock recipe, which we basically followed (maybe a little less salt, as we didn't add salt to the final product), plus an onion (skin on) and a couple of parsnips, so the result was quite a bit sweeter, likely, than the original.
We made a couple of batches (so far!) of venison chili with our own tomatoes, and while I'd like to use our own kidney beans, the recipe calls for 3 cups worth, and we didn't have enough for two batches as well as saving seed stock for next year. I started with the USDA's Chili Con Carne recipe, then went from there. I can't use chili powder (don't know what's in it that bothers me, but it does), so I added a lot of my own spicing to it. Star anise is just magic with rich meat; I've started adding it to most of my venison recipes.
Venison Chili
- 3 cups dried pinto or red kidney beans
- 5-1/2 cups water
- 3 lbs ground venison
- 1-1/2 cups chopped onion
- 1 cup chopped red & green bell peppers
- 1 tsp black pepper
- 2 tsp cocoa powder
- 1 tsp toasted ground cumin seed
- 1/2 tsp ground coriander
- 2 tsp ground cinnamon
- 1 tsp ground cloves
- 1 tsp paprika
- 3 to 6 tbsp chili powder
- 1 1/2 qts tomatoes, peeled & puréed
- 2 jalapeño peppers, chopped
- 5 cloves garlic, chopped
Please read Using Pressure Canners before beginning. If this is your first time canning, it is recommended that you read Principles of Home Canning.
Procedure:Wash beans thoroughly and place them in a 2 qt saucepan. Add cold water to a level of 2 to 3 inches above the beans and soak 12 to 18 hours. Drain and discard water. Combine beans with 5-1/2 cups of fresh water, and 2 teaspoons salt. Bring to a boil. Reduce heat simmer 30 minutes. Drain and discard water. Brown ground beef, chopped onions, and peppers, if desired, in a skillet. Drain off fat and add 3 teaspoons salt, pepper, chili powder, tomatoes, and drained cooked beans. Simmer 5 minutes. Caution: Do not thicken. Fill jars, leaving 1-inch headspace. Adjust lids and process according to the recommendations below.
| Recommended process time for Chile Con Carne in a weighted-gauge pressure canner. | ||||
| Canner Pressure (PSI) at Altitudes of | ||||
| Style of Pack | Jar Size | Process Time | 0 - 1,000 ft | Above 1,000 ft |
| Hot | Pints | 75 min | 10 lb | 15 lb |
Dave also got all the accouterments for sausage making this autumn, so we made some batches of venison sausage, too (with lots of meat in the freezer for making plenty more). We started off again at Hunter Gardener Angler Cook with this venison sausage recipe, tried it, then tweaked it for ourselves.
Venison Sausage
4 lb venison meat, ground
1 lb pork back fat, ground
1 tbsp Kosher salt
1 tbsp (heaping) dried juniper berries, chopped
2 tsp crushed dried sage (omit if canning the sausage meat, rather than casing & freezing)
1 tsp black pepper, ground
1/4 tsp (heaping) celery seed, ground
1/2 tsp cumin seed, toasted & ground
1 tsp coriander seed, crushed
1 tsp cinnamon, ground
2 star anise pods, ground
1/2 cup cold grape juice (the original called for gin; this is what we had on hand and it worked just fine)
Follow Hank's instructions for turning into sausages. It's usually suggested that you fry up some of the seasoned meat before you proceed much further, to make sure that you like the flavours you've added before you go to the bother of casing the sausages then find out you don't like it. Not a bad suggestion.
Finally, from one of my favourite cookbooks, Art of the Slow Cooker, comes a marvelous recipe for beef brisket that works just fine with venison cuts, especially big, juicy rump roasts.
Espresso Braised Venison
Rub:
2 tbsp finely ground espresso coffee beans
1 tbsp sugar
1 tsp garlic powder (or 1-2 cloves garlic finely minced)
1/2 tsp ground coriander
1/2 tsp cumin seed, toasted & ground
1/2 tsp coarsely ground black pepper
1/4 tsp Kosher salt
Mix above ingredients in a small bowl & rub all over the meat. Wrap in plastic wrap and let rest at least 1 hour (we usually let it rest in the fridge overnight).
2 tbsp olive oil, divided
3 lbs venison
1 large onion, chopped
1 1/2 cups strong brewed coffee
2 tbsp balsamic vinegar (we used our own fruit vinegar here, yumm)
1/4 cup dark molasses
1 tbsp Worcestershire sauce
2 whole cloves
Heat 1 tbsp oil in large skillet over medium-high heat and brown the venison on both sides (about 5 minutes per side). Transfer to a 5 or 6 quart slow cooker.
Add remaining 1 tbsp oil to skillet, add onion & cook until browned (about 3 minutes). Add remaining ingredients except for the cloves and bring to a boil. Pour over venison in slow cooker and throw the cloves into the liquid. Cover the cooker and cook on high 4 to 6 hours or low 8 to 10 hours until meat is fork tender.
Remove cooked meat from cooker and let rest. Cut across the grain, and serve with the sauce.
Happy Pantry
One of my favourite chores at the end of the growing season, once the hectic pace of harvesting and preserving is over, is to take stock of what we've got on our pantry shelves and create a tally of our preserves for the year. This summer was quite the challenge, balancing looking after our new girl Kate with the work of the harvest. Dave, of course, did most of the work. I won't go into totals, but here are lists of what we put together last summer and this summer.
2009 Preserves Tally
- Spiced sweet cherries - great with pork
- Cherry pie filling
- Cherry conserve
- Cherry juice - this was fabulous
- Tomatillo salsa verde
- Tomato & pepper salsa
- Pickled carrots
- Pickled dilled cucumbers
- Dilled green beans
- Preserved baby figs
- Orchard fruit chili sauce
- Pears in juice
- Pear ginger conserve - another fabulous preserve
- Spiced pickled pears - weird but good with meat
- Blackberry juice
- Blackberry pear juice blend
- Apples in blackberry juice
- Lime & ginger tomatillo marmalade
- Apple pie filling
- Tomatillo/Green tomato mincemeat
- Grape juice
- Cranberry salsa - a fantastic condiment with poultry, especially on leftover sandwiches with mayo
- Cranberry juice
- Hot pepper jam - quite a bit like sweet Thai chili sauce, and an essential condiment with pot stickers
- Chicken stock
- Fruit vinegar - another essential condiment with pot stickers
No cherries this year; really unfortunate year for cherries, sigh.
- Dilled green beans
- Pickled dilled cucumbers
- Apple blackberry juice
- Blackberry juice
- Raspberry juice - check out the Basil Sorbet using raspberry juice, yumm
- Cucumber relish - we used our overabundance of cucumbers and golden zucchinis, as well as our unripe Ruffle peppers for this fabulous relish. I highly recommend this recipe!
- Tomato & pepper salsa
- Tomatillo salsa
- Orchard fruit chili sauce
- Ginger pear conserve
- Tomatillo ginger & tangerine marmalade - even better than with lime!
- Green tomato mincemeat
- Hot pepper jam
- Honey plums
- Basil raspberry syrup - was supposed to be jelly, but didn't gel. Makes great syrup for pancakes!
- Chicken stock
- Venison stock
- Venison chili
- Fruit vinegar
Wednesday, November 3, 2010
Halva... Sort Of
I don't have an enormous sweet tooth, but I do love dessert, and I adore halva, a Middle Eastern sweet. We had some fantastic tahini in the cupboard, and some local honey, so I figured what a great use for these ingredients. I've never made it before, so I followed this recipe; I didn't find that it went into the correct texture for halva, I don't know what I did wrong, it's more like fudge. But it tastes great so who cares!!
Tahini Honey Halva
2 cups honey
1 1/2 cups tahini (stir it well if it has separated)
1 cup blanched, roasted & chopped almonds
vanilla or other flavouring to taste
Bring honey to a simmer, stirring to keep from getting hot spots or scorching. Cook until soft ball stage (or 240F/115C). Meanwhile, heat tahini in a separate pot (to 120F/50C), and blanch & roast the almonds (want the almonds hot). Let honey cool a little, then mix in heated almonds, then fold in warmed tahini.
I poured the warm mixture into a very slightly oiled Tupperware container. You can use oiled cake pan, lined with parchment, or oiled ramekins, as long as you can extricate the cooled candy afterward! If you let it cool, then cover to keep air out, leave for 36 hours in the refrigerator to develop the texture of the halva. I wasn't successful with that, but I didn't let it cool enough probably first (it was about 10 pm when I was done cooking it), so I'll try again!
Handsome Visitor

We had a barred owl visit us this afternoon - he sat on our orchard fence at least long enough for me to snap some photos. I think he was looking for our meadow voles, I hope that he got dinner (and that he comes back for more)!
Monday, August 2, 2010
It's an Orchid!
Dave found this on our property in June:
We thought it was a False Solomon's Seal, but the inflorescence wasn't quite right. So we waited until we got mature flowers. Today, Dave declared that it was an orchid based on the flowers. I was skeptical (bad me), so we went in with our camera, and yes! it certainly was an orchid.

 We think it's Epipactis helleborine, an introduction from Europe. There's a native version, but I'm pretty sure this isn't it. We'll wait for some more mature flowers and try again with a better camera.
Sunday, June 20, 2010
Basil Sorbet

It's been a few years, but we've finally successfully raised basil from seed. Probably not a major feat for most people, but we've never had any luck just spreading the seed and hoping for the best. This year, we used our under-heat propagators and had them started at the same time we started the tomatoes, then put them out into the greenhouse about the same time, and they are doing really, really well.
I wanted to do something different with the basil than just pesto (although I do love pesto), so I searched for a basil sorbet recipe. I found an intriguing sounding one and mostly followed it, with a couple of tweaks of my own.
Basil Lime Sorbet
• 4 cups water**
• 2 cups basil leaves, gently packed
• 1 cup fine sugar (we used organic evaporated cane sugar, and I'd use less next time)
• 1/4 cup fresh lime juice (I used three small fresh limes)
1. Bring water to a boil in small saucepan. Add basil leaves; cook 10 seconds. Drain and reserve cooking water, and immediately plunge basil into cold water. Drain again.
2. Return cooking water to small saucepan, add sugar, and bring back to a boil. Simmer until all sugar is dissolved, creating a simple syrup. Let cool a little, then place in refrigerator to cool completely (2-3 hours at least).
3. Puree lime juice and blanched basil leaves in blender on high speed for about 1 minute, or until you have a smooth, bright-green liquid. If you don't want leafy bits in your sorbet, pour through fine-meshed strainer; I didn't bother. Keep the juice in the refrigerator until ready to combine (see next step).
4. Once cooled, you can return everything to the blender together and reblend to mix the juice, basil & syrup properly. If you blend everything while the syrup is still hot, the basil loses its beautiful bright green; not that it changes the flavour, but it doesn't look as pretty.
5. Freeze in an ice cream maker until slushy-firm (about 25-35 minutes). You may freeze the results into a container separately in the freezer once at this consistency to firm up further, or just eat directly.
This recipe has a wonderful, unusual flavour; the basil is very much present but not overpowering. The lime juice provides a nice acidic hint, and the sugar seems to bring out the flavours of everything beautifully. I think another time that I'd like to try a watermelon sorbet recipe using basil as well... will let you know how that goes when I get around to it.
**EDIT - I highly recommend using 4 cups of raspberry juice (or, if you don't have your own raspberry juice, this might be a little pricey, so you can experiment with water and raspberry juice).
Thursday, June 17, 2010
Change Table / Dresser
 Dave has been working on a changing table / dresser for the nursery, and it's almost finished. He has to do a little sanding before painting it, but the top is a piece of Corian, so he's got a bit of sanding to polish that up to the right finish, too.
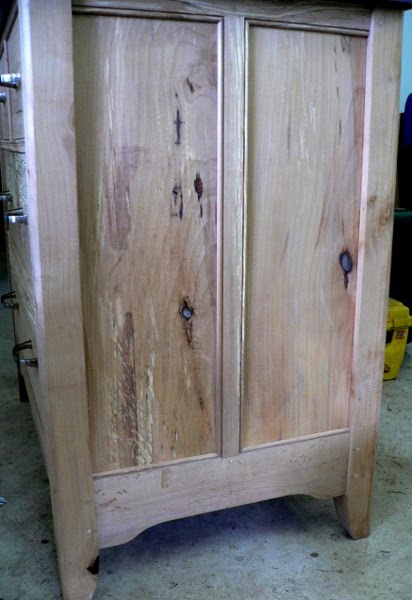 We picked up the hardware from Lee Valley, and it looks very nice on.
We've picked a colour to go with the purplish Corian, which will make repainting the nursery (when we get there) a bit of a challenge, but we'll figure something out.
Naturally, the piece is full of little details that just make it so beautiful, and of course, beautifully crafted: So exciting!!
Wednesday, June 16, 2010
Blue Fungus
 Dave discovered a collection of fascinating-looking, intense cyan blue fungus yesterday, and kindly brought the branch to the awkward pregnant lady so I didn't have to go wandering through the brush to see it. The fruiting bodies ranged from about 3mm to 7mm in width.
 Apparently it's Chlorociboria aeruginascens, which is not uncommon and found around North America and Europe; however, it is apparently unusual to see the fruiting bodies. Often, you'll just see the blue-green stain on the wood, usually a hardwood (apparently commonly on oak). We figure this is an alder branch, as Dave found it amongst the alder stand.
 Here are some links to further information about this species:
Wikipedia - Chlorociboria aeruginascens
Mushroom Expert - Chlorociboria aeruginascens
Rogers Mushrooms - Chlorociboria aeruginascens
WiseAcre Gardens - Blue Stain Fungus
Thanks, Dave, for another great fungus find!!
Tuesday, June 15, 2010
Happy Tomatoes
Things are progressing very well in the greenhouse. Earlier this week, we replaced the wooden stakes that the tomatoes were supported by with lines strung between eyehooks in the rafters and the raised bed sills. Dave ran across this idea from The Cottage Smallholder last May, and we both thought it would be a good thing to try. Last year, though, with the half wine barrels, it wasn't quite practical. This year, with the raised beds, everything lined up really well for this project. We use the Velcro ties from Lee Valley to support the tomatoes from the lines, and they're fantastic - reusable, super easy to implement, and very soft & delicate against the tomato stalks.
As you can see, everyone is really thriving - here are some images to compare to early May when we'd just transplanted all of these guys: Plus the middle bed now has plants in it: watermelons and cucumbers, and basil in between.
 We have our first tomato flowers, many even on the bigger tomatoes (not just the cherries):
 Our eggplants and peppers are doing really well; both varieties of each have really caught up. The initial transplants had the Dusky eggplants and Red Ruffle peppers ahead of the Listada de Gandia eggplants and jalapeño peppers, respectively. Everyone is looking fantastic now, and all our pepper plants are putting on little tiny flowers, which should be ready within the next few weeks for pollinating.
 The eggplants all look alike, but the growth pattern of the peppers are interestingly quite different; the Red Ruffle is the one on the left, the jalapeño on the right.
 So, fingers crossed that our "bumbling" hand pollinating will work again this year as well as they did last year.
Sunday, June 13, 2010
Wee Visitor
Last week, we had a little visitor roosting above our porch in the evenings: Now that the weather is better, he's not been coming around, but we noticed the bird poop first, as our bag of clothes pegs is right under his roost, and the poop was collecting. One evening, as I shut the screen door, I turned the outside light on and looked outside, and discovered the poop culprit: a wee chestnut-backed chickadee. Awww!!!
Birthday Cupcake
My uncle's birthday is this coming Tuesday, and we had some leftover icing, so Mom made a lovely little cupcake for his birthday cake:
This is way too much fun!
Fondant Animals
We took another workshop through Pat Spezowka at At the Sea B&B in Mill Bay, this time it was four hours this Saturday, introducing us to modelling fondant animals.
We started with a 1:1 mixture of fondant and gum paste, which you have to work quite well to warm up and make pliable. Once it's been worked, you must keep it out of the air, so we spent a lot of time shaping then sticking things in ziploc bags.
Our first project was a blue bird:
This gave us the opportunity to learn colouring and simple modelling techniques for the fondant. Next was a sheep, which has a fondant body that was then covered in royal icing piping for the wool (and fondant legs & head):
 Finally, we did fondant dogs:

It was a great workshop, once again; we learned a lot, had a lot of fun, and are inspired to play with this some more in the future.
On Our Own
We ordered some natural food colourings from India Tree and were anxious to give them a try with our own recipes. Mom sort of goes "by guess and by..." with her icing making, so I don't know what recipe she was following, other than using lots of icing sugar, a little butter, a little whipping cream, and I convinced her to use a little lemon juice (given the flavourings of our cake & filling). I can give you the recipes for the cake and filling though:
Lemon Cake
1 cup cream cheese
1 cup softened butter (although when baked, we found this way too much butter for the end result, so I'd suggest half that)
3/4 cup granulated cane sugar
3 eggs
1 1/2 tsp vanilla
2 tbsp lemon juice
1 1/2 cup brown rice flour
1/2 cup sifted whole wheat flour
1 tbsp grated lemon peel (enough from one lemon)
- Cream butter & cream cheese until smooth.
- Mix in sugar and beat again until smooth.
- Add eggs one at a time, beating until incorporated well.
- Stir in vanilla and lemon juice and lemon peel.
- Combine flour with baking powder, then stir into batter and beat until well combined.
- Pour into 2 greased loaf tins, or one 7" diameter round cake tin, or (probably) 12 cupcake cups (fill each 2/3 full).
- Bake at 350 F for 50-60 minutes (less for cupcakes), or until golden brown and cake tester comes away clean.
3/4 cup granulated cane sugar
5-6 tbsp cornstarch
2 cups water
2 eggs, beaten
3 tbsp butter
1/3 cup lemon juice
2 tsp grated lemon rind
- In microwave-proof glass measure, combine conrstarch and sugar.
- Gradually add water, stirring until smooth.
- Microwave on high (100%) 3-5 minutes until mixture thickens, stirring often.
- In a small separate bowl, beat eggs. Add small amount of hot cornstarch mixture into eggs, mixing, until bring temperature of eggs up.
- Slowly pour eggs into remaining hot cornstarch mixture, beating rapidly to prevent lumping.
- Cook custard on medium (50%) in microwave for 2-3 minutes until custard thickens slightly, and coats back of spoon. DO NOT BOIL or custard will curdle.
- Add lemon juice and rind and butter, stirring until butter melts and rind is incorporated.
- Let cool, but not set, if using for cake filling.

We stuck the tooth pick into the top half and bottom half of the cake before separating the layers so that we could align it properly after the filling was added. Put the top layer of cake onto the filling, then frost the cake. We used the "blue" straight out of the bottle for the base icing; however, there is no true natural "blue" that you can eat, it was more lavender coloured, which was actually very pretty.
We formed roses using the red and yellow dyes, respectively, which made beautiful colours individually.
 You can see that the "blue" is quite lavender, and as a result, the "green" isn't! Next time, we'll start with yellow and add just a hint of blue; this time, we were using the icing from the cake which was "blue" to start with.
The consistency of our icing was also far to thin for the roses; I think next time we'll stick with the Wilton "stiff" recipe for proportions, or use royal icing for the roses. The other problem is that the dyes are very liquid (unlike the artificial colouring that we used during the course), so you have to adjust the recipe to include the amount of dye you're going to use (or add more icing sugar). The butter in the icing also melted really fast in our hands in the piping bags, so it's worth chilling it in the bag first, then doing some icing, and maybe chilling in between once in a while.

As you can see, we didn't spend a lot of patience on trying to smooth the icing on our cake first. We did a little, but not a lot. It still tasted good! We used the "green" for the bottom border, and I placed some yellow and pink icing in one piping back without mixing to get the two-toned star border.
The cake was very rich and moist, and the use of a little whole wheat flour with the rice flour worked really well. The lemon custard could be more lemony, so I'd recommend a little more lemon juice and/or rind.
Wednesday, May 26, 2010
Last Cake Class
 ...for now, anyway! This class we learned how to make roses (can you tell?!?). The "old rose" coloured ones are mine, the white ones are Mom's, and we both did leaves & the bottom border. The buttercream (except we used Crisco for this class) icing got kind of soft; I'd like to try with a royal icing. The roses were difficult, but I think with practice, they'll be fun to do. I just ordered some natural colouring, so we'll hopefully get to play with that soon.
 We really had a great time in this four-week introductory piping class. We've signed up for a fondant animal sculpture workshop (assuming I'll still be able to make it... it's scheduled for June 12, so we'll see! At least the teacher is OK with me cancelling at the last minute). So if we make it to that workshop, I'll be sure to post about it. Otherwise, it'll be awhile before we take any more classes, but we might get an opportunity to practice what we've learned.
Monday, May 24, 2010
Bird Feeder Visitor
Mom decided to put some birdseed out as we've got a lot of black-headed grosbeak activity around lately. While there's plenty of food for them in our neighbourhood, it's nice to have them come right by the window so we can get a good look at them.
Of course, not only birds are interested in bird seed:
 And other members of the family like to take advantage of the wildlife viewing opportunities presented:

Wednesday, May 19, 2010
Cake Decorating
Since we've got a new addition on the way, Mom was getting into "Grandma" mode and really wanted to get prepped for making some proper birthday cakes in the future. We signed up for an introductory cake decorating class, and have been having a lot of fun with it. This class is about introduction to piping techniques, and how to bake & ice the "perfect" cake. It's being held at At the Sea B&B in Mill Bay, as the instructor, Pat, much prefers to work out of her own kitchen when possible (although she does teach at the Michael's in Langford, too).
The first class was a demo by Pat, then the next class we had to bake & ice a cake, and prepare icing in a bunch of different colours & thicknesses before the class in preparation. I just about walked out on the project at that point; I had no idea it would be so much prep work!! But the end result (a combination of piping techniques by both Mom & I) was pretty darned good for a first try:
As Mom can't eat the cake (made with an instant cake mix for this class) or the icing (because of the food colouring), and I just didn't want to eat all that fat & sugar all by myself, we gave the cake to our cousins, as we figured they'd at the very least have more mouths to divide the results between (they are five in the family).
We do have a recipe for a pound cake that works really well with rice flour, and apparently pound cakes are good for cutting up into layers, so we'll give that a try. I've also found some "natural dye" suppliers, so we'll also give that a go, rather than the chemical dyes that we don't really want to use anyway. Of course, they won't be as intense, but what the heck!
The third class this week was more piping techniques, but this time on cupcakes. Fortunately, we had left over icing, and we were a little better prepared so it wasn't quite the mad dash that the prep work for the second class was. Here are our results:
Mom's cupcakes:


 and my cupcakes:


 and our two "clown" cupcakes:

 Next week is the last class; we'll be learning the "Wilton Rose" which is a somewhat fancy piped rose, as well as sweet peas. The cake is baked, and while we've got the icing made, I think we might need to make some more or adjust what we have for consistency, and definitely add some colour to some of the batch (unless we want just white roses - which we might do). It's been really fun, and I'm looking forward to taking further classes in the future. Since next month is "D-Day", I think I'll have to hold off for at least a few months before I sign up for the next sessions, though!


